Have your Thanksgiving plans changed this year? Like many of you, visiting my family members means traveling by airplane to reach them. I’ve been trying to create some ways to make the holidays as special as possible—even with more distance between us than we expected.
One fun way I’m planning on helping us all feel more connected this fall is through virtual holiday craft gatherings. I’m sending our families little packages with the same craft supplies and some yummy treats. Then, we’ll gather together around our various tables—and our screens, connected to Zoom, of course—to make the same project, chat and catch up all at once.
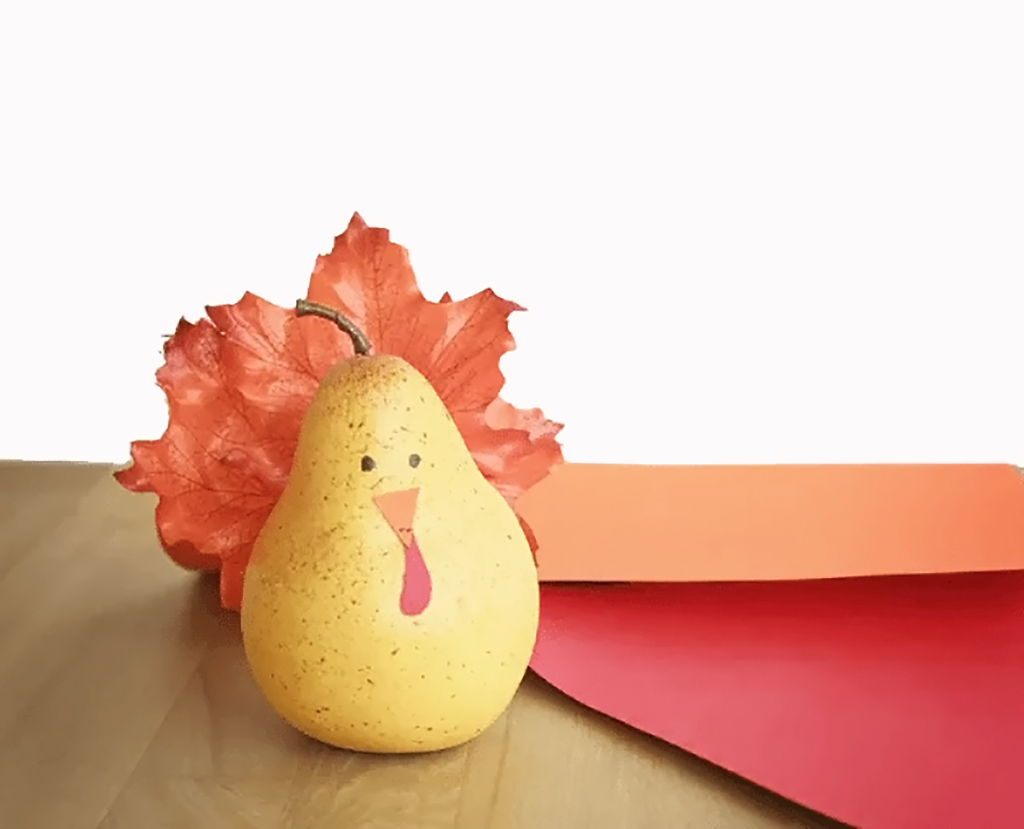
This pear turkey is a perfect project for virtual crafting. The foam pears weigh practically nothing. In addition, the postage won’t break the bank, and you will be able to slip a few extra snacks in the package to fuel everybody’s creativity. These turkeys make an excellent accent for your Thanksgiving tablescape or mantel. You could also add names to the front of each turkey to turn them into keepsake place cards.
Supplies
You can find all the supplies to make this project at your local craft store or on Amazon.
• Artificial foam pears (available in the floral department of craft stores)
• Sharp craft knife (see note above right)
• Hot glue gun and glue sticks or craft glue and foam brush
• Artificial autumn leaves or handprints cut from cardstock
• Orange and red cardstock, felt or craft foam sheets
• Permanent marker
• “Googly” eyes (available at craft stores), optional
Instructions
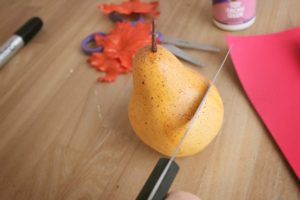
1. Starting about two-thirds of the way down a foam pear, cut a small slice, at approximately a 45-degree angle, into the back of the pear with the craft knife. Note: If you’re crafting with kids and want to allow them to make the project from start to finish, make the cuts yourself beforehand.
2. Apply a bit of hot glue onto the bottom of one of the leaves or handprints and quickly slide the items into the cut you made in the previous step. You can use a craft stick to help tuck the leaf or handprint into the cut. Note: For young kids, use a foam brush to apply craft glue (instead of hot glue) and adhere the leaves or handprint directly onto the back of the pear.
3. Continue adding leaves or handprints in various autumn shades until your pear has a full turkey tail. We used three large leaves for the pear in the picture.
4. Wipe away any excess glue. Rotate the pear so that the tail “feathers” are in the back.

5. Use cardstock, felt or craft foam to make the turkey wattle and beak. Draw a long, thin teardrop shape on the red material for the wattle and a triangle on the orange material for the beak. Cut out the shapes. Glue the wattle on the front center of the pear and glue the beak over the top of the wattle.
6. Use a permanent marker to add a few tiny dots on the beak and larger dots directly onto the pear for eyes. To add more personality, glue premade “googly” eyes, also available at craft stores, onto the pear instead of using the permanent marker.
7. If your pear is tail-heavy and tries to tip over, cut off a small portion of the bottom of the pear, angling up very slightly from front to back to prevent the pear from leaning back too much.
Take a screenshot of everyone in your family holding up their little turkeys on Zoom. Be sure to tag us on Instagram with @baltimoreschild to show off your handiwork.


